Showing posts with label Seafood. Show all posts

Wednesday, February 22, 2012

Baked Mahi Mahi with Tomato Relish


Zack made this entire meal by himself. Michelle was allowed to take pictures, but after a while, it drove her crazy not being able to help and abandoned the picture taking and went to a different area of the house. This was, however, quite possibly the most delicious piece of fish we've ever cooked (and by we, we mean Zack).


The entire meal was Baked Mahi Mahi with Tomato "Relish" over a bed of rainbow chard with baked carrots. We're going to split the chard and carrots into separate blogs. It would be a little cumbersome to put it all into one post.

Here's what you need:
For the Fish:
2 Mahi Mahi steaks
2 Tbsp Unsalted butter
1 cup White wine
Salt & pepper

For the "relish":
4 vine tomatoes
2 cloves garlic
1 Tbsp capers
1/2 lemon zest
1/2 lemon juice
salt & pepper


Here's what you do:
Start the relish by mincing up the garlic.


Quickly run a knife through the capers.


Seed and dicing the tomatoes.


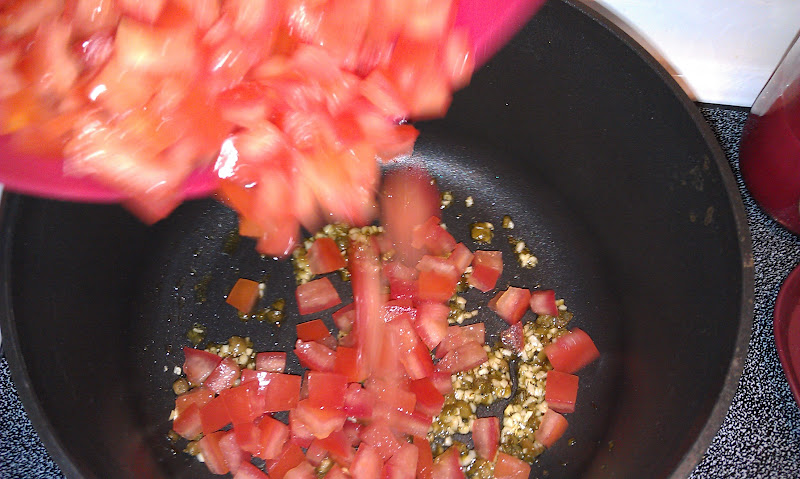
In a medium sauce pan, add about a 1/2 tablespoon of olive oil, and then the garlic and capers.


Let the capers and garlic cook for just a minute or two, then add the tomato.


Give everything a good stir and let it cook down.


Season with salt and pepper as needed.


At the very end, season with the zest of half a lemon and lemon juice. Taste to see if it needs more seasoning.


For the fish, preheat your oven to 350 degrees.


Place the fillets in a glass baking dish and season with salt and pepper.


Melt 2 tablespoons of butter.


Add the white wine to the measuring cup.


Pour that into the baking dish..


Bake for 20-30 minutes, or until fish is flaky and still juicy.


Rainbow chard recipe and carrot recipe coming soon!


Enjoy!

Saturday, January 21, 2012

Tuna Steaks with Lemon Caper Pan Sauce


We were at the grocery store the other day and noticed these beautiful tuna steaks were on sale. We haven't made tuna in AGES, so of course we picked some up. This recipe is pretty easy to make, and all of the other ingredients are ones we keep on hand all of the time.


Here's what you need:
2 Tuna Steaks (or however many you need to feed your group)
1 Tbsp olive oil (to coat the pan)
Kosher Salt 
Black pepper
Zest of 1 lemon
1/2 Tbsp capers with some juice
Juice from 1/2 a lemon
1/4 cup-ish white wine
1 Tbsp unsalted butter
Parsley to garnish


Here's what you do:
Heat the olive oil over medium heat in a skillet. We used our high-walled skillet, but any 10" pan will do.


Lightly salt and pepper the tuna on one side.


We also added the lemon zest to the oil to flavor it a bit. Tuna and lemon work great together, so we really wanted to impart some lemony flavor.


Place it in the pan, seasoned side down, then season the other side. 


Let those hang out for a couple minutes. You'll see the fish change from this gorgeous pink color to white about 1/3 of the way up the side. That's when you should flip. You should have some nice browning on the fish.


Let those hang out for another couple of minutes, until you can't see pink on the side anymore. 


Meanwhile, chop up some parsley. Set this aside to garnish your meal later.


Once the sides of the tuna are cooked, pull out and set in a warm oven to keep it from cooling too much.


Add the capers to the pan and let them cook for about a minute.


Next, add in the juice from 1/2 a lemon.


Next, pour in the white wine. We didn't measure it, just poured about 1/4 of a cup.


Let that simmer for a couple of minutes. You want the overt wine smell to cook off and let the sauce reduce a bit. (Not too much, you still want it thin).


At the very end, we decided it needed a little something to kick the sauce up a notch. We added 1 tablespoon of unsalted butter and it made the sauce perfect.


We let the butter melt and simmer for another couple of minutes. 


Next, we just composed our plate by topping the tuna with the pan sauce and then the parsley.


Tuna is best when it's pink in the middle. The fish stays juicy and flaky. It's completely safe, so don't worry about germs or bacteria. 


Enjoy!

Monday, December 12, 2011

Seared Diver Scallops with Lemon Pan Sauce


Every so often, we splurge and have scallops at home. Fresh scallops aren't cheap by any means, so it's a rare occurrence. 


Quick tip for purchasing scallops - If you buy them from the meat counter, be sure that the scallops are "dry". If they don't specifically say dry, we'd recommend buying the flash frozen scallops in the freezer case. Basically, some grocery stores soak their fresh scallops in a solution to help them stay fresh longer, however also preventing them for being able to get a good sear. The "dry" scallops have not been soaked in this solution and are just like you'd get in a restaurant.


Here's what you need:
Seared Scallops:
Scallops
Kosher salt
Butter
Vegetable oil


That's it. Don't ruin a perfectly good scallop with a lot of flavors!


Pan Sauce:
Zest of 1  lemon
2 Tbsp butter
1/4 cup parsley
1 Tbsp dry white wine


Here's what you do:
Heat a pan to medium high heat. We want to get a nice sear, while not over cooking the scallop.


While you're pan is heating up, pat your scallops dry with a paper towel and salt them lightly on one side.


Coat the bottom of the pan with vegetable oil and add a tablespoon of butter.


Place your scallops, seasoned side down, into the pan. Season the top lightly. Let the scallops cook for 3 minutes on this side.


After 3 minutes, your scallops should have a nice brown color on the bottom and they will have turned mostly white. Flip them over and let cook for just one minute on this side.


Remove them from the pan and set aside. Maybe pop them in the microwave to keep them warm while you make your pan sauce.


Add a couple more tablespoons of butter to the hot pan and let that clarify. It won't take long - your pan should still be pretty hot. You may want to lift it off the heat with the addition of each ingredient to prevent spattering. 


Add the white wine and let that simmer until it doesn't smell strongly like wine.


Now, add your lemon zest and let that simmer for just about 30 seconds. The zest in somewhere in those bubbles, we swear!


Finally, add the parsley in and remove from the heat. Stir it a bit to combine all of the flavors.


Spoon the pan sauce over the scallops.


We paired this with Zack's Mushroom Risotto. That blog will be coming soon.


Enjoy!

Thursday, December 8, 2011

Salmon Spread


Michelle's Aunt Susan and Uncle Tony brought this to Thanksgiving for an appetizer. Michelle's sister made this for a holiday party the next week, so we tagged along to document the process. Let us just say this... Michelle is not normally a huge fan of salmon, unless it's in this salmon spread. Oh. My. Goodness. It was amazing. 


Tony adapted this recipe from the late Frugal Gourmet, Jeff Smith, who reportedly took it from his mother. 


Here's what you need:
1 1/4 -1 1/2 lb salmon steaks
1/4 tsp liquid smoke (be careful with this because it can make it bitter)
1 1/2 tsp dried dill weed
1 package (8 oz.) cream cheese
2 Tbsp mayonnaise or sour cream
1 Tbsp horseradish
1 1/2 Tbsp lemon juice (Plus 1/4 cup for the poaching liquid)
Pinch of salt and pepper (plus 8-10 whole peppercorns for poaching liquid)
Water for poaching


Here's what you do:
This is best done in two steps. First, cook the salmon and cool before combining it with the cheese mix.


Poach the salmon in the water, lemon juice and peppercorns for about 8-10 minutes. Cool and remove any bones and skin before combining with the cheese mix. (If you are grilling ahead of time, you can grill the salmon and cool it. If you do this, watch the liquid smoke).


Soften the cream cheese to room temperature for at least one hour.


Combine the cream cheese, mayo (or sour cream), lemon juice, dill, horseradish, salt and pepper and mix until smooth.


Crumble the cooled salmon into pieces and combine with the cream cheese mix.


Form into a ball, cover with plastic wrap and refrigerate for a few hours or overnight. (It holds well for a couple of days as long as you keep it well sealed against other refrigerator smells).


Serve by spreading on pita chips, bagel chips, or other firm crackers.


Enjoy!